Tuesday, September 22, 2015

Elmer the Elephant


Have you ever heard of Elmer? He is a very unique elephant! My students love to listen to stories about him and there are a wide variety to choose from! 


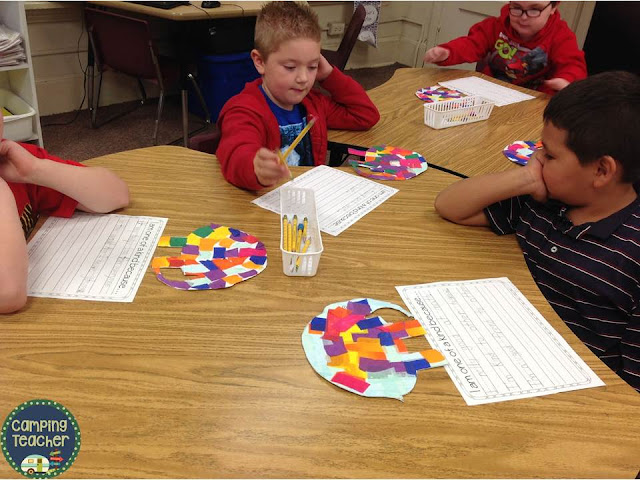
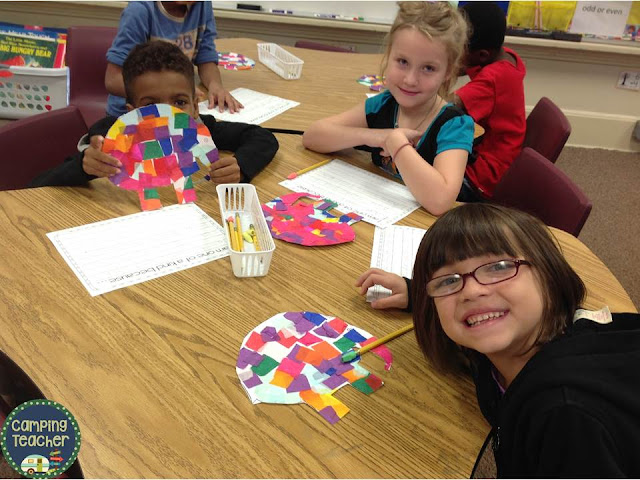
This week we also did a project to go along with our Elmer stories! 

The first thing I needed was an Elmer template. I was lucky to find the perfect one at Chelsey's blog called Buggy and Buddy. To grab her Elmer template click here. She uses this template for a wonderful sponge painting activity! After I grabbed the template, I blew it up on card stock as big as I could get it (actually, my husband did it because the copy machine and I are not on speaking terms right now.)


I had prepared ahead of time by cutting small pieces of tissue paper in assorted colors. My students dipped the tissue paper in the glue sponges and placed them on their Elmer. When they were done they cut their elephants out.


The next day, each child wrote about being one of a kind just like Elmer. Since I have a classroom of first and second graders this year it was nice to see the differences in writing styles and thoughts. Each child displayed their writing and their Elmers on construction paper. I think they came out wonderfully and the kids really enjoyed the activity!



Monday, September 21, 2015

I'm in Love!!!


I picked up the Scotch Laminator really unsure if I would like it. I had heard some great things about it from others online so I wanted to give it a try. Schools tend to buy the cheapest and thinnest laminating film and I wanted a better alternative. Well, I am happy to say that I am totally in love with this little machine!!!


My son, Matthew, helped me laminate and I couldn't believe how thick the pieces were. What a difference! Just what I needed!


Some wonderful teachers suggested using a dab of glue from a glue stick to hold small pieces still. that worked like a charm!


And here is what I laminated today! I wanted to laminate some math centers for my little ones!


Sunday, September 20, 2015

My Weekend Painting Project

 I spent part of my weekend painting a shelf my mother bought for me. (Thanks Mom!) The purpose of this shelf is to be used in my classroom as a bookshelf for my classroom library.

I love bright colors so I decided to go with this beautiful yellow.

A trick I learned is to put a rubber band around the can. When I dip my brush in the can I can scrape the paint off the brush along the rubber band if you have too much. I can also lay the brush on top and it won't fall in.

Another trick is to store my wet brush in a ziploc bag in my freezer. There is no need to clean it. When I'm ready to continue painting the brush is ready to go!

Here is how much I have painted so far. I will be working on it over a few weeks to get it all completed. (I have to admit that I really don't want to take this to school. I think it would look so much prettier filled with my fabric and quilts in my sewing room!)

Tuesday, September 15, 2015

Oh, Snap! October!


Fall is coming! I love pumpkins and Halloween. Roasted pumpkin seeds are my all time favorite! My students love the October activities that I bring to my classroom. I am linking up with Teacher Deals and Dollar Steals to share some of my favorite October Activities!

I'd like to start with my Halloween Task Cards freebie! They were so popular in my class last year! They can be used for the game Scoot or as task cards at a small group. I like to tape them on the wall around the room and then have the kids go around and answer the questions as a center.


I love to use my Halloween Pack each October! It is full of different activities for language arts and math to keep my students learning all month!

Want to teach your kids about scary bats and spiders? I have two products that will have you covered! I have bundled them together, but they can also be purchased separately!

And let's not forget that October is Fire Safety Month! I have a Fire Safety Pack just perfect for the occasion! 

Want to link up? Click the picture and join us!

Saturday, September 12, 2015

Halloween Goodies!

Last Christmas, I posted about making the famous Christmas mice. I have been making these for the last 20 years (at least!) But they are not just for Christmas. These mice are wonderful for Halloween treats as well, especially for Halloween parties! Originally, I remember this idea coming out of a magazine because I have been making these little critters well before the internet was ever a part of our homes and daily lives.
So here is the directions again, but this time just in time for Halloween!

These mice are really easy to make!  I prefer to purchase the good chocolate that candy makers use, but some people just melt chocolate bars.  It is a bit more expensive, but tastes so much better!  You can purchase different types and brands at candy supply stores.  Make sure you buy cherries that still have the stems on them. They sell them in jars at Walmart. Dip the cherries in the melted chocolate and lay on wax paper.  You must work fast because the chocolate hardens quickly.  Add a Hershey Kiss to the front and two slivers of almonds for ears.  After it all hardens, I use a small tube of icing (sold at any grocery store) and add two white or pink eyes.  And that's all there is to it!  It is always a favorite at parties or added to a plate of cookies that I give as a gift.  Enjoy!

Wednesday, September 9, 2015

King of the Numbers

I'm linking up with Kayla from K's Classroom Kreations and Theresa from Theresa's Teaching Tidbits for September's Math Tip Monday!
This month's theme is number sense. I would like to share a game I played when I taught kindergarten called 'King of the Numbers'. It is a very simple game I made up to help the children learn to count to 100. It was very effective and the kindergarteners loved it!

I placed a chair at the front of the group sitting on the rug and I would have the children take turns sitting in the chair and count 1-100 without making a mistake. For example: The first child might count to 35 without making a mistake. He would get to wear a crown, be king, and stay in the chair until someone beat him. Each child would get a turn. If a child didn't beat the king he would sit back down. If a child counted higher without making a mistake he would get to steal the crown and sit in the chair. He was now the king. I kept a list of my class names in a notebook and I would jot down how far they counted without a mistake each day so I could see the progress. When a child could count all the way to 100 without making any mistakes they were the ultimate king! They received a paper crown on the wall that had their name on it. The kids really wanted to get that crown on the wall! Once a child gets the ultimate king they no longer play the game. They only observe. The game gets faster as more children get ultimate king because there are less players. Every single kindergartener in my class made ultimate king. 

Things to know:
1) The king of the numbers wore his crown all day (except to PE).
2) The crown I used was actually a Halloween costume crown made out of fabric so it was durable. (I took it home and washed it and sprayed it with Lysol a lot!)
3) Sometimes there was a tie that day. If that happened both students sat in the chair together. If they were both king they would take turns wearing the crown for the day.
4) The paper crown was a printout of a crown I found on the internet. I printed it on colored paper and the children chose their color when they made ultimate king.

I played this game for all three years I taught kindergarten and the kids loved it and most importantly it worked!


How To Load A Laminator

My librarian showed me and my teammate how to load the laminator. I decided it would be best to record her on my IPad for future reference. Without the video I would be doomed to forget everything! I wanted to share the video in case anyone else needed it. I hope it helps!


Tuesday, September 8, 2015

Math Centers

This year I will be teaching math in small groups so math centers will play a daily part of our math routine. If you have been reading previous posts you know that I have a combination class of 1st and 2nd graders. As they rotate through math centers they will come to one that involves a hands on activity such as a matching activity or a game.

Below are pictures of one of my favorites! The kids really enjoy it and it keeps that particular group engaged while I am working with my other group.


The students pick a card. In this particular case everyone is working on addition (I also have subtraction). At the top are three numbers. The students get those three number cards and now have to use their reasoning skills to determine which two of those numbers will equal the sum. When they have figured out the answer they record it on their sheet. This center is excellent for getting my students thinking!

If you are interested in this center it comes in single-digit addition and subtraction and double-digit addition and subtraction. Check it out by clicking on the pictures below or the words above. Happy teaching!


Monday, September 7, 2015

An Easy Trick That Helps

As a teacher, I think it's important to share our tricks of the trade with each other. I'm an older teacher. I graduated from college in the early 90's and I admit I took a class where they showed us how to load the filmstrip on a projector. I am one of those teachers that collected the teacher worksheet books from the local teacher store and did my student teaching in a school that still had the mimeograph/ditto machine in the workroom. (and yes, the teachers used it....and so did I.) 

With the birth of the internet and TpT, my teacher books were used less and less, but I have to admit I still use some religiously! I love them and they work well for me. Maybe you have some favorite teacher books you still copy from also. 

When I first started teaching, I would forget which pages I had already copied from. My students would tell me that we had already done that page six months prior.  (They never forget anything like that, but they never remember their addition facts do they?!?!?) So I developed a system. I put a post-it note in the front cover each year (or use the same one if I only copied a few pages the previous year). Each time I make copies from the book I write down the page number, that way I don't repeat any pages. Some of my books I skip around in so this is very helpful! Just a simple easy trick that helps a lot!